A machine learning safety net

A while back, I wrote about machine learning safety measures. I was thinking about how easy it is to accidentally make terrible models (e.g. training a support vector machine on unscaled data), or misuse good models (e.g. forgetting to scale data before making a prediction). I suggested that one solution might be to make tools that help spot these kinds of mistakes:

[We should build] software to support good practice. Many of the problems I’m talking about are quite easy to catch, or at least warn about, during the training and evaluation process. Unscaled features, class imbalance, correlated features, non-IID records, and so on. Education is essential, but software can help us notice and act on them.

Introducing redflag

I’m pleased, and a bit nervous, to introduce redflag, a new Python library to help find the sorts of issues I’m describing. The vision for this tool is as a kind of safety net, or ‘entrance exam for data’ (a phrase Evan coined several years ago). It should be able to look at an array (or Pandas DataFrame), and flag potential issues, perhaps generating a report. And it should be able to sit in your Scikit-Learn pipeline, watching for issues.

The current version, 0.1.9 is still rather rough and experimental. The code is far from optimal, with quite a bit of repetition. But it does a few useful things. For example, suppose we have a DataFrame with a column, Lithology, which contains strings denoting 9 rock types (‘sandstone’, ‘limestone’, etc). We’d like to know if the classes are ‘balanced’ — present in roughly similar numbers — or not. If they are not, we will have to be careful with how we split this dataset up for our model evaluation workflow.

>>> import redflag as rf
>>> rf.imbalance_degree(df['Lithology'])
3.37859304086633
>>> rf.imbalance_ratio([df['Lithology'])
8.347368421052632

The imbalance degree, defined by Ortigosa-Hernandez et al. (2017), tells us that there are 4 minority classes (the next integer above this number), and that the imbalance severity is somewhere in the middle (3.1 would be well balanced, 3.9 would be strongly imbalanced). The simpler imbalance ratio tells us that there’s about 8 times as much of the biggest majority class as of the smallest minority class. Conclusion: depending on the size of this dataset, the class imbalance is probably not a show-stopper, but we need to pay attention.

Our dataset contains well log data. Unless they are very far apart, well log samples are usually not independent — they are correlated in depth — and this means we can’t split the data randomly in our evaluation workflow. Redflag has a function to help detect features that are correlated to themselves in this way:

>>> rf.is_correlated(df['GR'])
True

We need to be careful!

Another function, rf.wasserstein() computes the Wasserstein distance, aka the earth mover’s distance, between distributions. This can help us figure out if our data splits all have similar distributions or not — an important condition of our evaluation workflow. I’ll feed it 3 splits in which I have forgotten to scale the first feature (i.e. the first column) in the X_test dataset:

>>> rf.wasserstein([X_train, X_val, X_test])
array([[32.108,  0.025,  0.043,  0.034],
       [16.011,  0.025,  0.039,  0.057],
       [64.127,  0.049,  0.056,  0.04 ]])

The large distances in the first column are the clue that the distribution of the data in this column varies a great deal between the three datasets. Plotting the distributions make it clear what happened.

Working with sklearn

Since we’re often already working with scikit-learn pipelines, and because I don’t really want to have to remember all these extra steps and functions, I thought it would be useful to make a special redflag pipeline that runs “all the things”. It’s called rf.pipeline and it might be all you need. Here’s how to use it:

from sklearn.pipeline import make_pipeline
from sklearn.preprocessing import StandardScaler
from sklearn.svm import SVC

pipe = make_pipeline(StandardScaler(), rf.pipeline, SVC())

Here’s what this object contains:

Pipeline(steps=[('standardscaler', StandardScaler()),
                ('pipeline',
                 Pipeline(steps=[('rf.imbalance', ImbalanceDetector()),
                                 ('rf.clip', ClipDetector()),
                                 ('rf.correlation', CorrelationDetector()),
                                 ('rf.outlier', OutlierDetector()),
                                 ('rf.distributions',
                                  DistributionComparator())])),
                ('svc', SVC())])

Those redflag items in the inner pipeline are just detectors — think of them like smoke alarms — they do not change any data. Some of them acquire statistics during model fitting, then apply them during prediction. For example, the DistributionComparator learns the feature distributions from the training data, then compares the prediction data to them, to help ensure that you aren’t trying to extrapolate with your model. For example, it will warn you if you train a model on low-GR sandstones then try to predict on high-GR shales.

Here’s what happens when I fit my data with this pipeline:

These are just warnings, and it’s up to me to act on them. I can adjust detection thresholds and other aspects of the algorithms under the hood, but the goal is for redflag to wave its little flag, but not to get in the way. Apart from the warnings, this pipeline works exactly as it did before.


If this project sounds interesting or useful to you, please give it a look. The documentation is here, and contains more examples like those above. If you find bugs or want to request enhancements, there’s the GitHub Issues page. And if you use it for anything you can share, I’d love to hear how you get along!

Love Python and seismic? You need xarray

If you use Python on a regular basis, you might have noticed that Pandas is eating everything, not just things made out of bamboo.

But one thing Pandas is not useful for is 2-D or 3-D (or more-D) seismic data. Its DataFrames are implicitly two-dimensional tables, and shine when the columns represent all sorts of different quantities, e.g. different well logs. But, the really powerful thing about a DataFrame is its index. Instead of having row 0, row 1, etc, we can use an index that makes sense for the data. For example, we can use depth for the index and have row 13.1400 and row 13.2924, etc. Much easier than trying to figure out which index goes with 13.1400 metres!

Seismic data, on the other hand, does not fit comfortably in a table. But it would certainly be convenient to have real-world coordinates for the data as well as NumPy indices — maybe inline and crossline numbers, or (UTMx, UTMy) position, or the actual time position of the timeslices in milliseconds. With xarray we can.

In essence, xarray brings you Pandas-like indexing for n-dimensional arrays. Let’s see why this is useful.

Make an xarray.DataArray

The DataArray object is analogous to a NumPy array, but with the Pandas-like indexing added to each dimension via a property called coords. Furthermore, each dimension has a name.

Imagine we have a seismic volume called seismic with shape (inlines, xlines, time) and the inlines and crosslines are both numbered like 1000, 1001, 1002, etc. The time samples are 4 ms apart. All we need is an array of numbers representing inlines, another for the xlines, and another for the time samples. Then we can construct the DataArray like so:

 
import xarray as xr

il, xl, ts = seismic.shape  # seismic is a NumPy array.

inlines = np.arange(il) + 1000
xlines = np.arange(xl) + 1000
time = np.arange(ts) * 0.004

da = xr.DataArray(seismic,
                  name='amplitude',
                  coords=[inlines, xlines, time],
                  dims=['inline', 'xline', 'twt'],
                  )

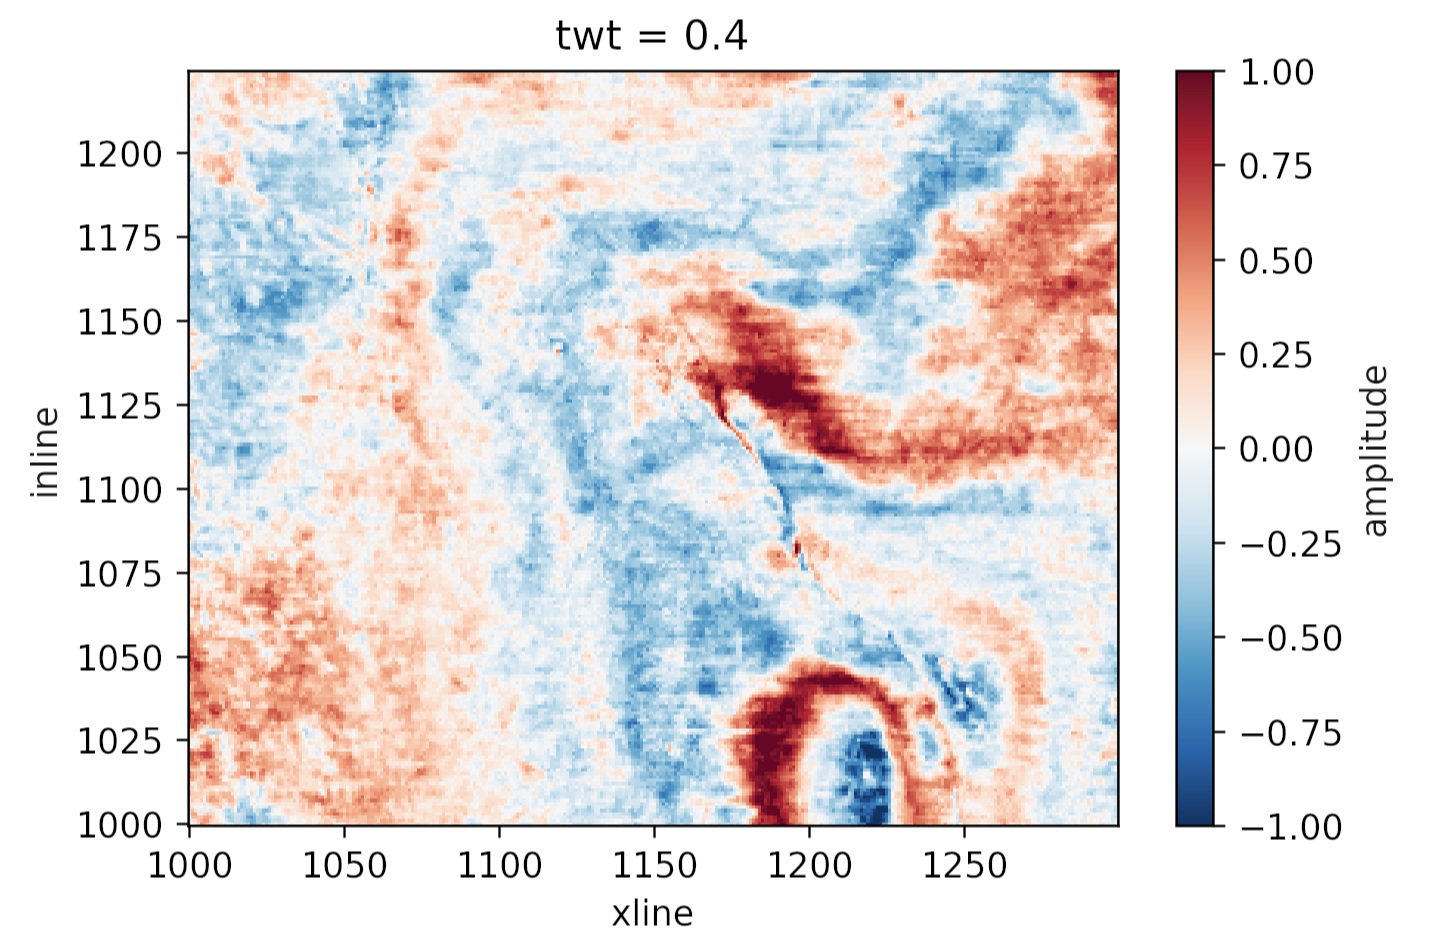
This object da has some nice superpowers. For example, we can visualize the timeslice at 400 ms with a single line:

da.sel(twt=0.400).plot()

to produce this plot:

Plotting the same thing from the NumPy array would require us to figure out which index corresponds to 400 ms, and then write at least 8 lines of matplotlib code. Nice!

What else?

Why else might we prefer this data structure over a simple NumPy array? Here are some reasons:

  • Extracting amplitude (or whatever) on a horizon. In particular, if the horizon is another DataArray with the same dims as the volume, this is a piece of cake.

  • Extracting amplitude along a wellbore (again, use the same dims for the well path).

  • Making an arbitrary line (a view not aligned with the rows/columns) is easier, because interpolation is ‘free’ with xarray.

  • Exchanging data with Pandas DataFrame objects is easy, making reading from certain formats (e.g. OpendTect horizon export, which gives you inline, xline coords, not a grid) much easier. Even better: use our library gio for this! It makes xarray objects for you.

  • If you have multiple attributes, then xarray.Dataset is a nice data structure to keep things straight. You can think of it as a dictionary of DataArray objects, but it’s a lot more than that.

  • You can store arbitrary metadata in xarray objects, so it’s easy to attach things you’d like to retain like data rights and permissions, seismic attribute parameters, data acquisition details, and so on.

  • Adding more dimensions is easy, e.g. offset or frequency, because you can just add more dims and associated coords. It can get hard to keep these straight in NumPy (was time on the 3rd or 4th axis?).

  • Taking advantage of Dask, which gives you access to parallel processing and out-of-core operations.

All in all, definitely worth a look for anyone who uses NumPy arrays to represent data with real-world coordinates.


Do you already use xarray? What kind of data does it help you with? What are your reasons? Did I miss anything from my list? Let us know in the comments!

Build an app with Python

Do you have an idea for an app?

Or maybe a useful bit of code you want to share with others, but you’re not sure where to start?

Lots of people come to our Geocomputing class — which is for outright beginners — saying, "I want to build an app". Most of them are thinking of a mobile or desktop app, but most beginners don't know much about the alternatives. Getting useful software into other people’s hands doesn’t necessarily mean making a desktop application. Alternatives include programming libraries, command line tools, and web applications with or without public machine interfacecs (so-called APIs) — and it’s hard to discover and learn about things you don’t know exist.

Now, coming up with a streamlined set of questions to figure out which kind of tool might best match your goals for ‘an app’ is probably impossible. So I gave it a try:

There’s a lot of undocumented nuance in this flowchart. For example:

  • There are a lot of other ways to achieve all of the things I mention in the orange boxes. I picked on some examples, but you could also make a web app — with an API — with Flask or Django. You can make a library or CLI (command line interface) tool with modules from the standard library. There are lots of ways to build a desktop app with a GUI (none of them exactly easy). Indeed, you can run a web app on the desktop in various ways.

  • You might be wondering, “where is ‘Build a mobile app’?” It’s not there. I don’t think building native mobile apps is usually the best idea, especially for relative beginners to Python. Web apps are easier to make, they work on any platform, and are easier to maintain. It helps if you’re online of course, but it is possible to write web apps that work offline too.

  • The main idea is to make something. You want to build the easiest or fastest thing that solves the problem for a few important users and use cases. Because if you can make something they will at least test a few times, you can get some awesome feedback for the next iteration — which might be a completely different thing.

So, take it with a large grain of salt! I hope it’s a tiny bit useful, and at least gives you some things to Google the next time you’re thinking about building ‘an app’.


I tweeted about this flowchart. If you want to adapt it for your own purposes, the original is here.

Thank you to Software Undergrounders Rafael, Lukas, Leo, Kent, Rob, Martin and Evan for helping me improve it. I’m still responsible for its many flaws.

Comparing regressors

There are several really nice comparisons between various algorithms in the Scikit-Learn documentation. The most famous, and useful, one is probably the classifier comparison:

A comparison of classification algorithms. Each row is a different dataset; each column (except the first) is a different classifier, each trying to separate the blue and red points. The accuracy score of each classifier is show in the lower right corner of each plot. There’s so much to look at in this one plot!

There’s also a very nice clustering algorithm comparison, and this anomaly detection comparison. As usual with awesome open source software packages like Scikit-Learn, the really wonderful thing is that all the source code is right there so you can hack these things to show your own data.

What about regression?

Regression problems are the other major kind of machine learning task. If the thing you’re trying to predict is not a category (like ‘blue’ or ‘red’, as above) but a continuous property (like porosity, say), then you’re looking at a regression problem.

I wondered what a comparison plot for the various regressors in Scikit-Learn would look like. I couldn’t find one, so I made one. I made up three one-dimensional datasets — one linear, one polynomial, and one periodic. Then I tried predicting each one with various different model types, from linear regression to a deep neural network. Here’s version 1 (well, 0.1 really) of my script; feel free to adapt and improve it!

Here’s the plot it produces:

A comparison of most of the regressors in scikit-learn, made with this script. The red lines are unregularized models; the blue have regularization. The pale points are the validation data. The small numbers in each plot are RMS error (lower is better!).

I think this plot repays careful study. Notice the smoothing effect of regularization. See how tree-based methods result in discretized predictions, and kernel-based ones are pretty horrible at extrapolation.

I’m 100% open to feedback on ways to improve this plot… or please improve it and show me how it goes!

Take one, make one

There’s a teaching method originating in medicine known as “see one, do one, teach one”. I like it because it underscores hands-on practice and knowledge sharing as essential steps in developing a craft — and it works. Today, I want to urge you to take a challenge, then make one for others.

First, what’s the challenge?

A couple of years ago, inspired by the annual Advent of Code challenges, we introduced the kata, a set of coding challenges especially for geoscientists. For a long time we sent them to students in our Geocomputing class, to encourage them to keep coding. Now we just tell everyone about them.

At the time we announced the kata, there were five puzzles. Today, there are 11: four beginner-friendly challenges, four intermediate ones, and three quite hard ones. Topics range from data munging to map indexing, and from digital elevation models to fractures.

💡 If you want to try one, this Colab is the easiest way to get started: https://ageo.co/kata-live

Now make one!

Once you’ve got an idea of how these things work, you might want to try your hand at making one. Once you have an idea for a short task, you need a way to generate a random dataset. For example, for the sample-names challenge, I have a function that generates a random set of sample names, composed of several parts (a number, a basin, a formation, a data, etc).

When you have a dataset, you can ask some questions about it. Start with an one, and build from there. The last question (there can be 3 or 4), should be a somewhat realistic challenge for this kind of data. Each question needs a hint, and each question must have only one possible answer (this is the tricky bit!).

If you fancy trying your hand at it, check out our new kata-dev repository on GitHub. There is a demo challenge there, which is also live on the kata server, so you can see how it all works. Good luck!


Whether or not you try making a challenge for your peers, so let us know how you get on in the #kata-challenges channel on the Software Underground. We’re always ready to answer questions about them.

Rocks in the Playground

It’s debatable whether neural networks should feature in an introductory course on machine learning. But it’s hard to avoid at least mentioning them, and many people are attracted to machine learning courses because they have heard so much about deep learning. So, reluctantly, we almost always get into neural nets in our Machine learning for geoscientists classes.

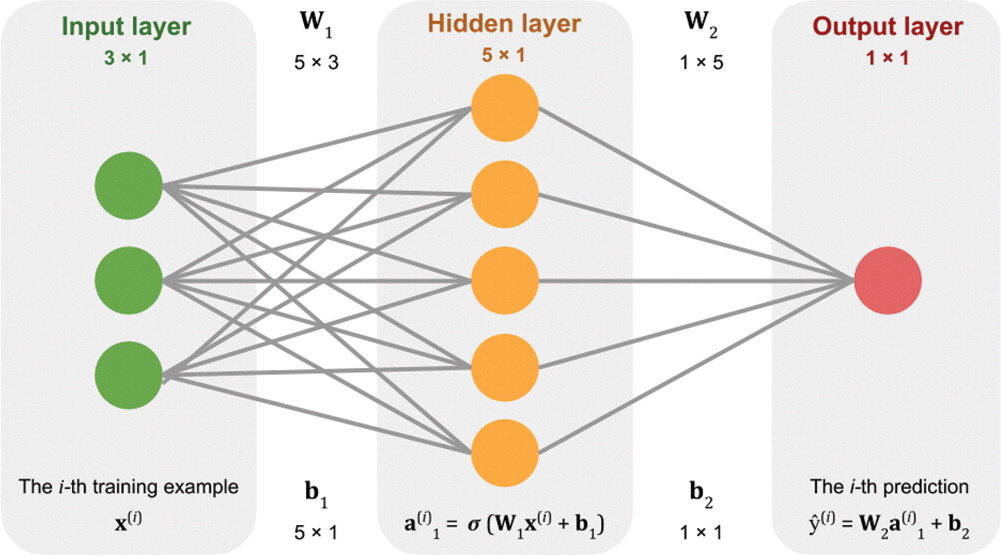
Our approach is to build a neural network from scratch, using only standard Python and NumPy data structures — that is, without using a specialist deep-learning framework. The code is all adapted from Gram Ganssle’s awesome Leading Edge tutorial from 2018. I like it because it lays out the components — the data, the activation function, the cost function, the forward pass, and all the steps involved in backpropagation — then combines them into a working neural network.

Figure 2 from Gram Ganssle’s 2018 tutorial in the Leading Edge. Licensed CC BY.

Figure 2 from Gram Ganssle’s 2018 tutorial in the Leading Edge. Licensed CC BY.

One drawback of our approach is that it would be quite fiddly to change some aspects of the network. For example, adding regularization, which almost all networks use, or even just adding another layer, are both beyond the scope of the class. So I like to follow it up with getting the students to build the same network using the scikit-learn library’s multilayer perceptron model. Then we build the same network using the PyTorch framework. (And one could do it in TensorFlow too, of course.) All of these libraries make it easier to play with the various options.

Introducing the Rocky Playground

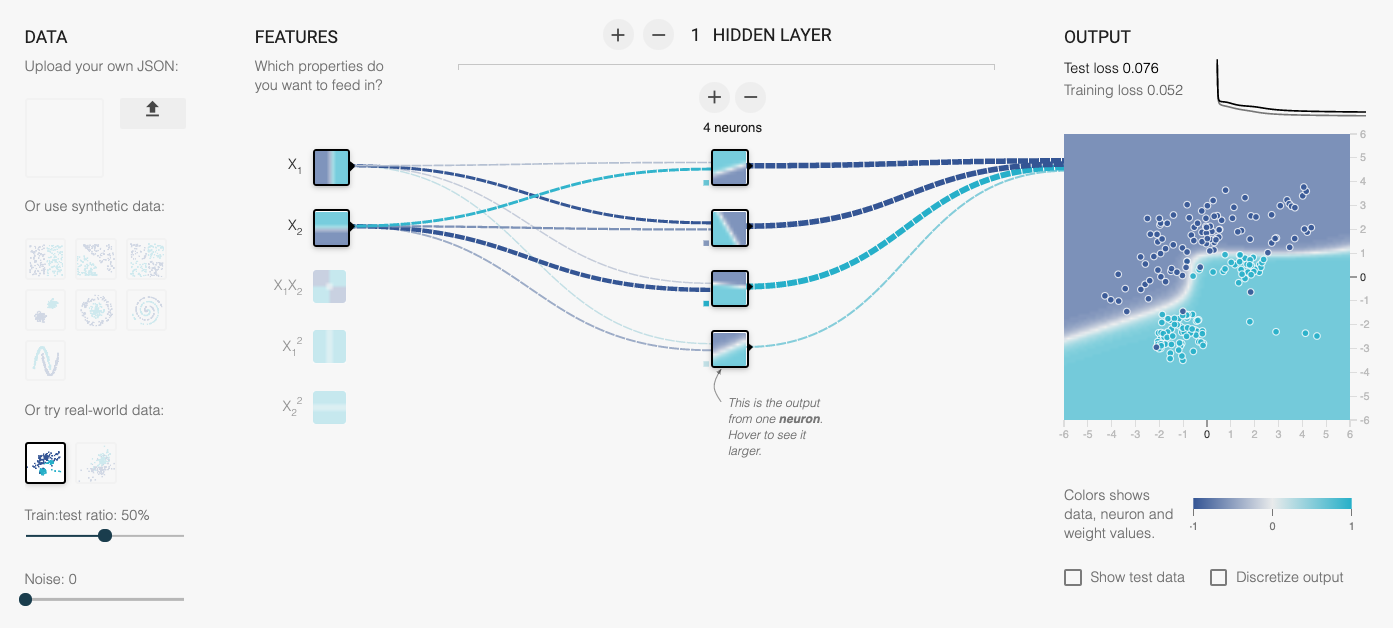
Now we have another tool — one that makes it even easier to change parameters, add layers, use regularization, and so on. The students don’t even have to write any code! I invite you to play with it too — check out the Rocky Playground, an interactive deep neural network you can see inside.

Part of the user interface. Click on the image to visit the site.

Part of the user interface. Click on the image to visit the site.

This tool is a fork of Google’s well-known Neural Network Playground, as described at the bottom of our tool’s page. We made a few changes:

  • Added several new real and synthetic datasets, with descriptions.

  • There are more activation functions to try, including ELU and Swish.

  • You can change the regularization during training and watch the weights.

  • Anyone can upload their own dataset! (These stay on your computer, they are not uploaded anywhere.)

  • We added an the expression of the network in Python code.

One of the datasets we added is the same shear-sonic prediction dataset we use in the neural network class. So students can watch the same neural net they built (more or less) learn the task in real time. It’s really very cool.

I’ve written before about different expressions of mathematical ideas — words, symbols, annotations, code, etc. — and this is really just a natural extension of that thought. When people can hear and see the same idea in three — or five, or ten — different ways, it sticks. Or at least has a better chance of sticking.

What do you think? Do this tool help you? Could you use it for teaching? If you have suggestions feel free to drop them here in the comments, or submit an issue to the tool’s repo. We’d love your help to make it even more useful.

More ways to make models

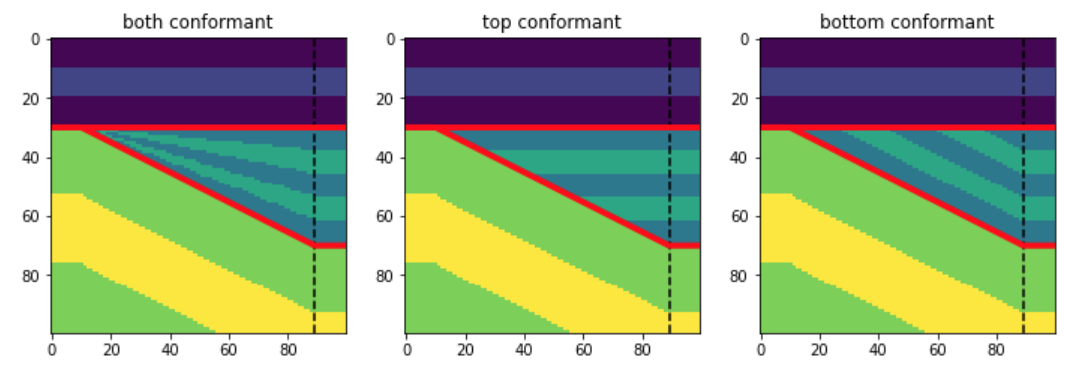
A few weeks ago I wrote about a new feature in bruges for making wedge models. This new feature makes it really easy to make wedge models, for example:

 
import bruges as bg import matplotlib.pyplot as plt strat = [(0, 1, 0), (2, 3, 2, 3, 2), (4, 5, 4)] wedge, *_ = bg.models.wedge(strat=strat, conformance=’top’) plt.imshow(wedge)

And here are some examples of what this will produce, depending on the conformance argument:

wedge_conformance.png

What’s new

I thought it might be interesting to be able to add another dimension to the wedge model — in and out of the screen in the models shown above. In that new dimension — as long as there are only two rock types in there — we could vary the “net:gross” of the wedge.

So if we have two rock types in the wedge, let’s say 2 and 3 as in the wedges shown above, we’ll end up with a lot of different wedges. At one end of the new dimension, we’ll have a wedge that is all 2. At the other end, it’ll be all 3. And in between, there’ll be a mixture of 2 and 3, with the layers interfingering in a geometrically symmetric way.

Let’s look at those 3 slices in the central model shown above:

bruges_wedge_slices.png

We can also see slices in that other dimension, to visualize the net:gross variance across the model. These slices are near the thin end of the wedge, the middle, and the thick end:

bruges_netgross_slices.png

To get 3D wedge models like this, just make a binary (2-component) wedge and add breadth=100 (the number of slices in the new dimension).

These models are admittedly a little mind-bending. Here’s what slices in all 3 orthogonal directions look like, along with (very badly) simulated seismic through this 3D wedge model:

bruges_all_the_slices.png

New wedge shapes!

As well as the net-to-gross thing, I added some new wedge shapes, so now you can have some steep-sided alternatives to the linear and sigmoidal ramps I had in there originally. In fact, you can pass in a wedge shape function of your own, so there’s no end to what you could implement.

bruges_new_wedge_shapes.png

You can read about these new features in this notebook. Please note that you will need the latest version of bruges to use these new features, so run pip install —upgrade bruges in your environment, then you’ll be all set. Share your models, I’d love to see what you make!

An open source wish list

After reviewing a few code-dependent scientific papers recently, I’ve been thinking about reproducibility. Is there a minimum requirement for scientific code, or should we just be grateful for any code at all?

The sky’s the limit

Click to enlarge

I’ve come to the conclusion that there are a few things that are essential if you want anyone to be able to do more than simply read your code. (If that’s all you want, just add a code listing to your supplementary material.)

The number one thing is an open licence. (I recently wrote about how to choose one). Assuming the licence is consistent with everything you have used (e.g. you haven’t used a library with the GPL, then put an Apache licence on it), then you are protected by the indeminity clauses and other people can re-use your code on your terms.

After that, good practice is to improve the quality of your code. Most of us write horrible code a lot of the time. But after bit of review, some refactoring, some input from colleagues, you will have something that is less buggy, more readable, and more reusable (even by you!).

If this was a one-off piece of code, providing figures for a paper for instance, you can stop here. But if you are going to keep developing this thing, and especially if you want others to use it to, you should keep going.

Best practice is to start using continuous integration, to help ensure that the code stays in good shape as you continue to develop it. And after that, you can make your tool more citable, maybe write a paper about it, and start developing a user/contributor community. The sky’s the limit — and now you have help!

Other models

When I shared this on Twitter, Simon Waldman mentioned that he had recently co-authored a paper on this topic. Harrison et al (2021) proposed that there are three priorities for scientific software: to be correct, to be reusable, and to be documented. From there, they developed a hierachy of research software projects:

  • Level 0 — Barely repeatable: the code is clear and tested in a basic way.

  • Level 1 — Publication: code is tested, readable, available and ideally openly licensed.

  • Level 2 — Tool: code is installable and managed by continuous integration.

  • Level 3 — Infrastructure: code is reviewed, semantically versioned, archived, and sustainable.

There are probably still other models out there.— if you know if a good one, please drop it in the Comments.

References

Sam Harrison, Abhishek Dasgupta, Simon Waldman, Alex Henderson & Christopher Lovell (2021, May 14). How reproducible should research software be? Zenodo. DOI: 10.5281/zenodo.4761867

Survival of the fittest or overcrowding?

If you’ve been involved in drilling boreholes in your career, you’ll be familiar with desurvey. Desurvey is the process of converting a directional well survey — which provides measured depth, inclination and azimuth points from the borehole — into a position log. The position log is an arbitrarily finely sampled set of (x, y, z) points along the wellbore. We need this to convert from measured depth (distance along the borehole path) to depth in the earth, which is usually given relative to mean sea-level.

I hunted around recently and found no fewer than nine Python packages that contain desurvey code. They are of various vintages and licences:

Other larger tools that contain desurvey code but not as re-usable

This is amazing — look at all the activity in the last 2 years or so! I think this is a strong sign that we've hit a new era in geocomputing. Fifteen years ago a big chunk of the open source geoscience stuff out there was the ten-or-so seismic processing libraries. Then about 7 or 8 years ago there was a proliferation of geophysical modeling and inversion tools. Now perhaps we're seeing the geological and wells communities entering the same stage of evolution. This is encouraging.

What now?

But there’s a problem here too. — this is a small community, with limited resources. Can we afford this diversity? I accept that there might be a sort of Cambrian explosion event that has to happen with new technology. But how can we ensure that it results in an advantageous “survival of the fittest” ecology, and avoid it becoming just another way for the community to spread itself too thinly? To put it another way, how can we accelerate the evolutionary process, so that we don’t drain the ecosystem of valuable resources?

There’s also the problem of how to know which of these tools is the fittest. As far as I’m aware, there are no well trajectory benchmarks to compare against. Some of the libraries I listed above do not have rigorous tests, certainly they all have bugs (it’s software) — how can we ensure quality emerges from this amazing pool of technology?

I don’t know, but I think this is a soluble problem. We’ve done the hard part! Nine times :D


swung_round_135px.png

There was another sign of subsurface technology maturity in the TRANSFORM conference this year. Several of the tutorials and hackathon projects were focused on integrating tools like GemPy, Devito, segyio, and the lasio/welly/striplog family. This is exciting to see — 2021 could be an important year in the history of the open subsurface Python stack. Stay tuned!

Which programming language should you learn first?

The question I get asked most often is:

I want to learn to code, where should I start?

To which there’s really no perfect answer. It depends on a lot of things… Why do you want to learn to program? What domain are you in? Have you tried before? Do you like computers? Do your colleagues use anything in particular?

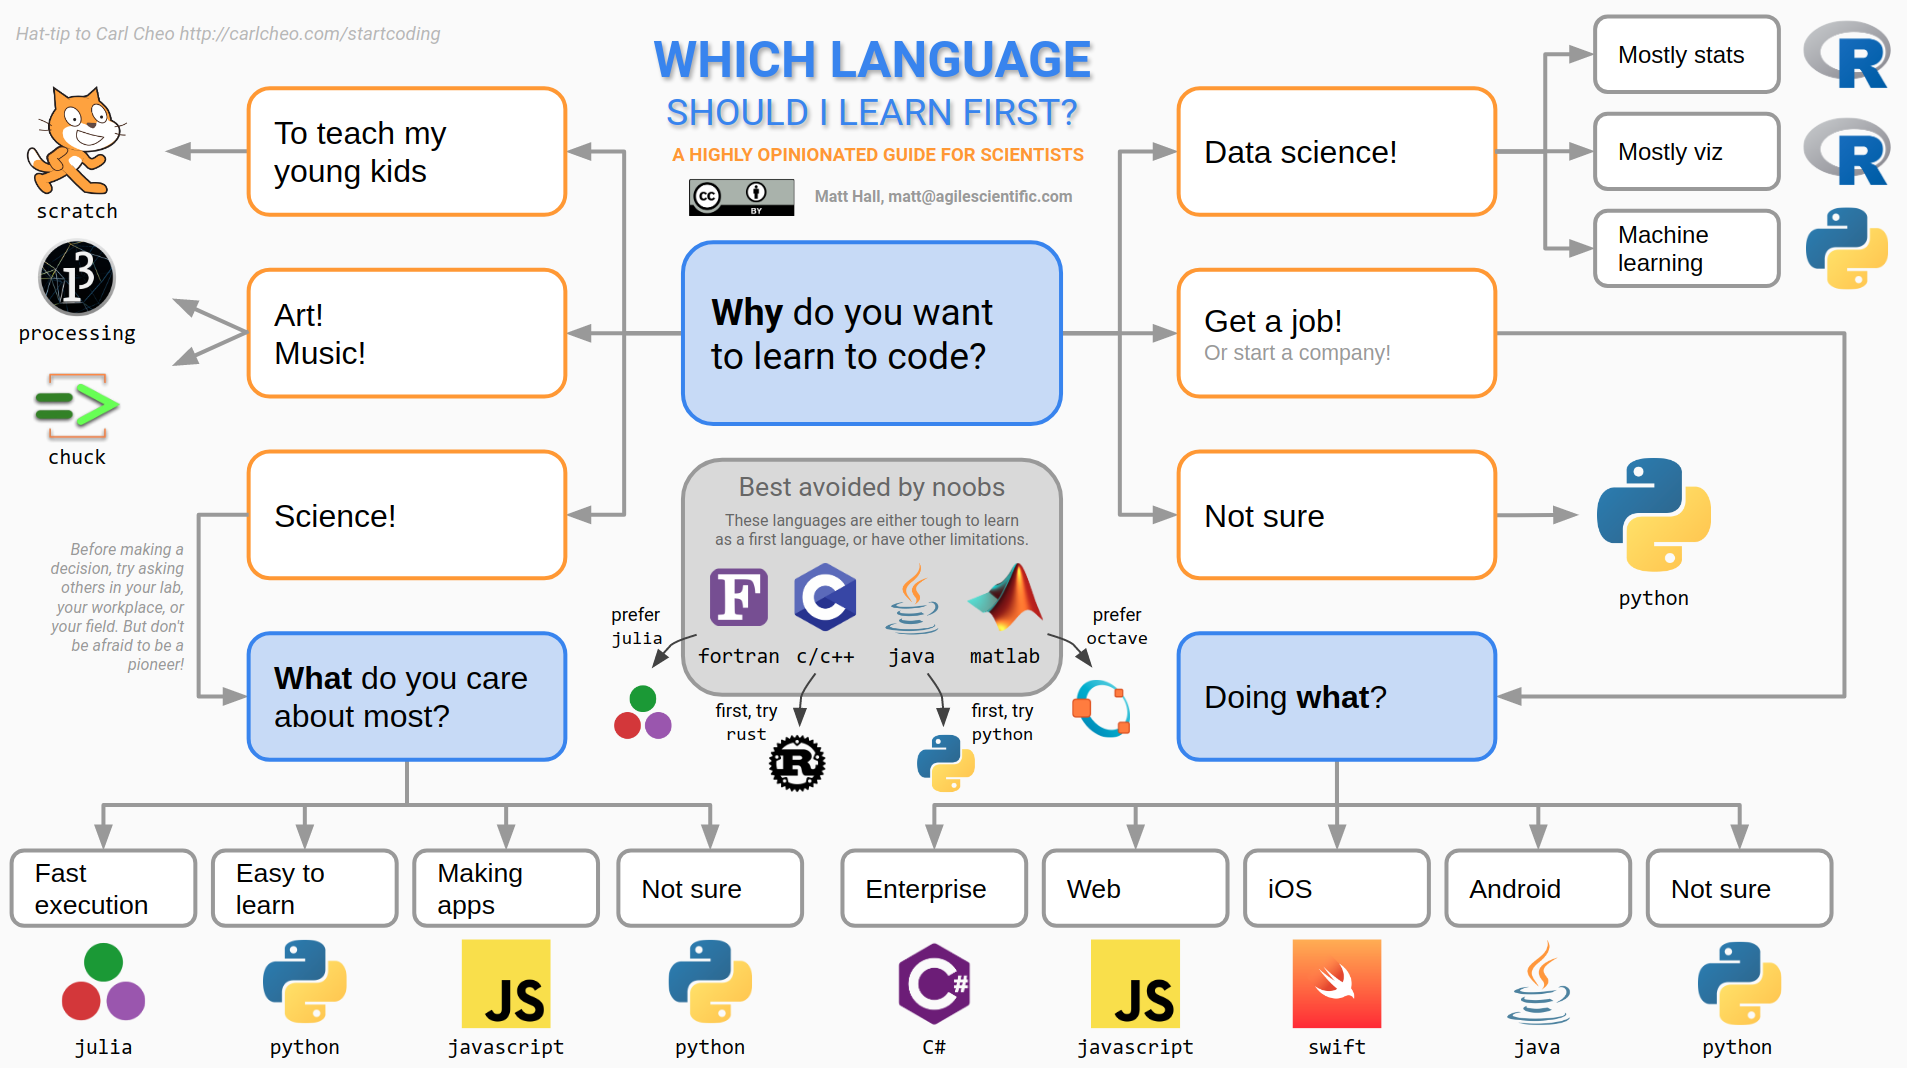
Undeterred by the futility, and inspired by an awesome blog post on freecodecamp.org, which advises you to learn JavaScript (not terrible advice), I thought I’d try to answer the question — for scientists. I adapted a rather old decision tree in that blog post to the specific needs of scientists. Here is the latest version:

which.png

Yes, it does have a lot of Python on it. Yes, I am biased.

These sorts of things are necessarily rather one-dimensional. In an effort to give general advice, all the interesting corners are sanded down. For instance, there is definitely some domain specificity to languages. In the subsurface domain, a lot of geophysicists learned their craft in MATLAB, but today are excited about Julia. I think environmental folks are more into R. Geologists mostly still like coloured pencils best. And of course reservoir engineers mastered VBA years ago. Clearly, if you’re learning to code to start a postgraduate degree, you should probably find out what language others in your lab are using before you crack into that old copy of FORTRAN in a Weekend.*

Anyway, this decision tree thing provoked quite a bit of discussion on Software Underground and Twitter. Some people felt challenged, although my purpose was to suggest a starting point for people, not to say “Never touch Java” (although, seriously, never touch Java). It’s natural — learning to master a language takes years and people are sensitive to perceived criticism of how they spent their time. But this misses the point a bit — programming is really just about getting things done, preferably in an open language (<cough> not MATLAB). So what’s the quickest path for a new programmer to start getting things done?

I appreciated this thoughtful comment from Kris Kuhlman:

I think it worked out more or less that way for me. I learned a bit of BASIC as a 12-year-old, and knew enough assembly to crash a BBC Micro. Then I learned awk in 1993, and used it for basically everything — including many things it certainly was not designed for. I tried and failed to learn Java in 2002, instead picking up MATLAB… which led to Python in about 2008. I was a slow learner though; it took years to be convinced that I needed NumPy. (Yes, you can load seismic as a list of lists.)

In the end, you need several tools in your belt. Several people pointed out that SQL (a so-called ‘domain specific language’ rather than a full-blown programming language) is incredibly useful to know. I think you could say the same for HTML and maybe even XML — or perhaps JSON these days. Then again, maybe these stretch the definition of ‘programming language’ a bit too far. Besides, if you write code, you’ll meet them eventually.

In the end, the point is to get things done. Every language on that tree will enable you to get things done. (Admittedly, Scratch, Processing, ChucK have rather narrow domains.) Fortran has been around for 70 years (not a typo) and is still in the top 20 languages. So don’t sweat it — if Kris is right, you’ll need to learn 2 languages before one sticks anyway.


* There is no such book, lol.