EAGE 2013 in a nutshell

I left London last night for Cambridge. On the way, I had a chance to reflect on the conference. The positive, friendly vibe, and the extremely well-run venue. Wi-Fi everywhere, espresso machines and baristas keeping me happy and caffeinated.

Knowledge for sale

I saw no explicit mention of knowledge sharing per se, but many companies are talking about commoditizing or productizing knowledge in some way. Perhaps the most noteworthy was an update from Martyn Millwood Hargrave at Ikon's booth. In addition to the usual multi-client reports, PowerPoint files, or poorly architected database, I think service companies are still struggling to find a model where expertise and insight can be included as a service, or at least a value-add. It's definitely on the radar, but I don't think anyone has it figured out just yet.

Better than swag

Yesterday I pondered the unremarkability of carrot-and-ginger juice and Formula One pit crews. Paradigm at least brought technology to the party. Forget Google Glass, here's some augmented geoscience reality:

Trends good and bad

This notion of 3D seismic vizualization and interpretation is finally coming to gathers. The message: if you are not going pre-stack, you are missing out. Pre-stack panels are being boasted in software demos by the likes of DUG, Headwave, Transform, and more. Seems like this trend has been moving in slow motion for about a decade.

Another bandwagon is modeling while you interpret. I see this as an unfeasible and potentially dangerous claim, but some technologies companies are creating tools and workflows to fast-track the seismic interpretation to geologic model building workflows. Such efficiencies may have a market, but may push hasty solutions down the value chain. 

What do you think? What trends do you detect in the subsurface technology space? 

Fitting a model to data

In studying the earth, we can't afford to take enough observations, and they will never be free of noise. So if you say you do geoscience, I hereby challenge you to formulate your work as a mathematical inverse problem. Inversion is a question: given the data, the physical equations, and details of the experiment, what is the distribution of physical properties? To answer this question we must address three more fundamental ones (Scales, Smith, and Treitel, 2001):

  • How accurate is the data? Or what does fit mean?
  • How accurately can we model the response of the system? Have we included all the physics that can contribute signifcantly to the data?
  • What is known about the system independent of the data? There must be a systematic procedure for rejecting unreasonable models that fit the data as well.

Setting up an inverse problem means coming up with the equations that contain the physics and geometry of the system under study. The method for solving it depends on the nature of the system of equations. The simplest is the minimum norm solution, and you've heard of it before, but perhaps under a different name.

To fit is to optimize a system of equations

For problems where the number of observations is greater than the number of unknowns, we want to find which unknowns fit the best. One case you're already familiar with is the method of least squares — you've used it fitting a line of through a set of points. A line is unambiguously described by only two parameters: slope a and y-axis intercept b. These are the unknowns in the problem, they are the model m that we wish to solve for. The problem of line-fitting through a set of points can be written out like this,

As I described in a previous post, the system of the problem takes the form d = Gm, where each row links a data point to an equation of a line. The model vector m (M × 1), is smaller than the data d (N × 1) which makes it an over-determined problem, and G is a N × M matrix holding the equations of the system.

Why cast a system of equations in this matrix form? Well, it turns out that the the best-fit line is precisely,

which are trivial matrix operations, once you've written out G.  T means to take the transpose, and –1 means the inverse, the rest is matrix multiplication. Another name for this is the minimum norm solution, because it defines the model parameters (slope and intercept) for which the lengths (vector norm) between the data and the model are a minimum. 

One benefit that comes from estimating a best-fit model is that you get the goodness-of-fit for free. Which is convenient because making sense of the earth doesn't just mean coming up with models, but also expressing their uncertainty, in terms of the errors with which they are linked.

I submit to you that every problem in geology can be formulated as a mathematical inverse problem. The benefit of doing so is not just to do math for math's sake, but it is only through quantitatively portraying ambiguous inferences and parameterizing non-uniqueness that we can do better than interpreting or guessing. 

Reference (well worth reading!)

Scales, JA, Smith, ML, and Treitel, S (2001). Introductory Geophysical Inverse Theory. Golden, Colorado: Samizdat Press

Well-tie workflow

We've had a couple of emails recently about well ties. Ever since my days as a Landmark workflow consultant, I've thought the process of calibrating seismic data to well data was one of the rockiest parts of the interpretation workflow—and not just because of SynTool. One might almost call the variety of approaches an unsolved problem.

Tying wells usually involves forward modeling a synthetic seismogram from sonic and density logs, then matching that synthetic to the seismic reflection data, thus producing a relationship between the logs (measured in depth) and the seismic (measured in travel time). Problems arise for all sorts of reasons: the quality of the logs, the quality of the seismic, confusion about handling the shallow section, confusion about integrating checkshots, confusion about wavelets, and the usability of the software. Like much of the rest of interpretation, there is science and judgment in equal measure. 

Synthetic seismogram (right) from the reservoir section of the giant bitumen field Surmont, northern Alberta. The reservoir is only about 450 m deep, and about 70 m thick. From Hall (2009), Calgary GeoConvention. 

Synthetic seismogram (right) from the reservoir section of the giant bitumen field Surmont, northern Alberta. The reservoir is only about 450 m deep, and about 70 m thick. From Hall (2009), Calgary GeoConvention

I'd go so far as to say that I think tying wells robustly is one of the unsolved problems of subsurface geoscience. How else can we explain the fact that any reasonably mature exploration project has at least 17 time-depth curves per well, with names like JLS_2002_fstk01_edit_cks_R24Hz_final?

My top tips

First, read up. White & Simm (2003) in First Break21 (10) is excellent. Rachel Newrick's essays in 52 Things are essential. Next, think about the seismic volume you are trying to tie to. Keep it to the nears if possible (don't use a full-angle stack unless it's all you have). Use a volume with less filtering if you have it (and you should be asking for it). And get your datums straight, especially if you are on land: make certain your seismic datum is correct. Ask people, look at SEGY headers, but don't be satisfied with one data point.

Once that stuff is ironed out:

  1. Chop any casing velocities or other non-data off the top of your log.
  2. Edit as gently and objectively as possible. Some of those spikes might be geology.
  3. Look at the bandwidth of your seismic and make an equivalent zero-phase wavelet.
  4. Don't extract a wavelet till you have a few good ties with a zero-phase wavelet, then extract from several wells and average. Extracting wavelets is a whole other post...
  5. Bulk shift the synthetic (e.g. by varying the replacement velocity) to make a good shallow event tie.
  6. Stretch (or, less commonly, squeeze) the bottom of the log to match the deepest event you can. 
  7. If possible, don't add any more tie points unless you really can't help yourself. Definitely no more than 5 tie points per well, and no closer than a couple of hundred milliseconds.
  8. Capture all the relevant data for every well as you go (screenshot, replacement velocity, cross-correlation coefficient, residual phase, apparent frequency content).
  9. Be careful with deviated wells; you might want to avoid tying the deviated section entirely and use verticals instead. If you go ahead, read your software's manual. Twice.
  10. Do not trust any checkshot data you find in your project — always go back to the original survey (they are almost always loaded incorrectly, mainly because the datums are really confusing).
  11. Get help before trying to load or interpret a VSP unless you really know what you are doing.

I could add some don'ts too...

  • Don't tie wells to 2D seismic lines you have not balanced yet, unless you're doing it as part of the process of deciding how to balance the seismic. 
  • Don't create multiple, undocumented, obscurely named copies or almost-copies of well logs and synthetics, unless you want your seismic interpretation project to look like every seismic interpretation project I've ever seen (you don't).

Well ties are one of those things that get in the way of 'real' (i.e. fun) interpretation so they sometimes get brushed aside, left till later, rushed, or otherwise glossed over. Resist at all costs. If you mess them up and don't find out till later, you will be very sad, but not as sad as your exploration manager.

Update

on 2013-04-27 13:25 by Matt Hall

Can't resist posting this most excellent well tie. Possibly the best you'll ever see.

Picture by Maitri, licensed CC-BY-NC-SA

Update

on 2014-07-04 13:53 by Matt Hall

Evan has written a deconstructed well-tie workflow, complete with IPython Notebook for you to follow along with, for The Leading Edge. Read Well-tie calculus here.

More than a blueprint

blueprint_istock.jpg
"This company used to function just fine without any modeling."

My brother, an architect, paraphrased his supervisor this way one day; perhaps you have heard something similar. "But the construction industry is shifting," he noted. "Now, my boss needs to see things in 3D in order to understand. Which is why we have so many last minute changes in our projects. 'I had no idea that ceiling was so low, that high, that color, had so many lights,' and so on."

The geological modeling process is often an investment with the same goal. I am convinced that many are seduced by the appeal of an elegantly crafted digital design, the wow factor of 3D visualization. Seeing is believing, but in the case of the subsurface, seeing can be misleading.

Not your child's sandbox! Photo: R Weller.

Not your child's sandbox! Photo: R Weller.

Building a geological model is fundamentally different than building a blueprint, or at least it should be. First of all, a geomodel will never be as accurate as a blueprint, even after the last well has been drilled. The geomodel is more akin to the apparatus of an experiment; literally the sandbox and the sand. The real lure of a geomodel is to explore and evaluate uncertainty. I am ambivalent about compelling visualizations that drop out of geomodels, they partially stand in the way of this high potential. Perhaps they are too convincing.

I reckon most managers, drillers, completions folks, and many geoscientists are really only interested in a better blueprint. If that is the case, they are essentially behaving only as designers. That mindset drives a conflict any time the geomodel fails to predict future observations. A blueprint does not have space for uncertainty, it's not defined that way. A model, however, should have uncertainty and simplifying assumptions built right in.

Why are the narrow geological assumptions of the designer so widely accepted and in particular, so enthusiastically embraced by the industry? The neglect of science keeping up with technology is one factor. Our preference for simple and quickly understood explanations is another. Geology, in its wondrous complexity, does not conform to such easy reductions.

Despite popular belief, this is not a blueprint.We gravitate towards a single solution precisely because we are scared of the unknown. Treating uncertainty is more difficult that omitting it, and a range of solutions is somehow less marketable than precision (accuracy and precision are not the same thing). It is easier because if you have a blueprint, rigid, with tight constraints, you have relieved yourself from asking what if?

  • What if the fault throw was 20 m instead of 10 m?
  • What if the reservoir was oil instead of water?
  • What if the pore pressure increases downdip?

The geomodelling process should be undertaken for the promise of invoking questions. Subsurface geoscience is riddled with inherent uncertainties, uncertainties that we aren't even aware of. Maybe our software should have a steel-blue background turned on as default, instead of the traditional black, white, or gray. It might be a subconscious reminder that unless you are capturing uncertainty and iterating, you are only designing a blueprint.

If you have been involved with building a geologic model, was it a one-time rigid design, or an experimental sandbox of iteration?

The photograph of the extensional sandbox experiment is used with permission from Roger Weller of Cochise College. Image of geocellular model from the MATLAB Reservoir Simulation Toolbox (MRST) from SINTEF applied mathematics, which has been recently released under the terms of the GNU General public license! The blueprint is © nadla and licensed from iStock. None of these images are subject to Agile's license terms.

Building Tune*

Last Friday, I wrote a post on tuning effects in seismic, which serves as the motivation behind our latest app for Android™ devices, Tune*. I have done technical and scientific computing in the past, but I am a newcomer to 'consumer' software programming, so like Matt in a previous post about the back of the digital envelope, I thought I would share some of my experiences trying to put geo-computing on a mobile, tactile, always-handy platform like a phone.

Google's App Inventor tool has two parts: the interface designer and the blocks editor. Programming with the blocks involves defining and assembling a series of procedures and variables that respond to the user interface. I made very little progress doing the introductory demos online, and only made real progress when I programmed the tuning equation itself—the science. The equation only accounts for about 10% of the blocks. But the logic, control elements, and defaults that (I hope) result in a pleasant design and user experience, take up the remainder of the work. This supporting architecture, enabling someone else to pick it up and use it, is where most of the sweat and tears go. I must admit, I found it an intimidating mindset to design for somebody else, but perhaps being a novice means I can think more like a user? 

This screenshot shows the blocks that build the tuning equation I showed in last week's post. It makes a text block out of an equation with variables, and the result is passed to a graph to be plotted. We are making text because the plot is actually built by Google's Charts API, which is called by passing this equation for the tuning curve in a long URL. 

Agile Tune app screenshotUpcoming versions of this app will include handling the 3-layer case, whereby the acoustic properties above and below the wedge can be different. In the future, I would like to incorporate a third dimension into the wedge space, so that the acoustic properties or wavelet can vary in the third dimension, so that seismic response and sensitivity can be tested dynamically.

Even though the Ricker wavelet is the most commonly used, I am working on extending this to include other wavelets like Klauder, Ormsby, and Butterworth filters. I would like build a wavelet toolbox where any type of wavelet can be defined based on frequency and phase spectra. 

Please let me know if you have had a chance to play with this app and if there are other features you would like to see. You can read more about the science in this app on the wiki, or get it from the Android Market. At the risk (and fun) of nakedly exposing my lack of programming prowess to the world, I have put a copy of the package on the DOWNLOAD page, so you can grab Tune.zip, load it into App Inventor and check it out for yourself. It's a little messy; I am learning more elegant and parsimonious ways to build these blocks. But hey, it works!

Tuning geology

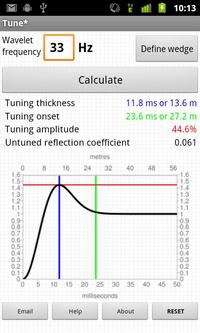
It's summer! We will be blogging a little less often over July and August, but have lots of great posts lined up so check back often, or subscribe by email to be sure not to miss anything. Our regular news feature will be a little less regular too, until the industry gets going again in September. But for today... here's the motivation behind our latest app for Android devices, Tune*.

Geophysicists like wedges. But why? I can think of only a few geological settings with a triangular shape; a stratigraphic pinchout or an angular unconformity. Is there more behind the ubiquitous geophysicist's wedge than first appears?

Seismic interpretation is partly the craft of interpreting artifacts, and a wedge model illustrates several examples of artifacts found in seismic data. In Widess' famous paper, How thin is a thin bed? he set out a formula for vertical seismic resolution, and constructed the wedge as an aid for quantitative seismic interpretation. Taken literally, a synthetic seismic wedge has only a few real-world equivalents. But as a purely quantitative model, it can be used to calibrate seismic waveforms and interpret data in any geological environment. In particular, seismic wedge models allow us to study how the seismic response changes as a function of layer thickness. For fans of simplicity, most of the important information from a wedge model can be represented by a single function called a tuning curve.

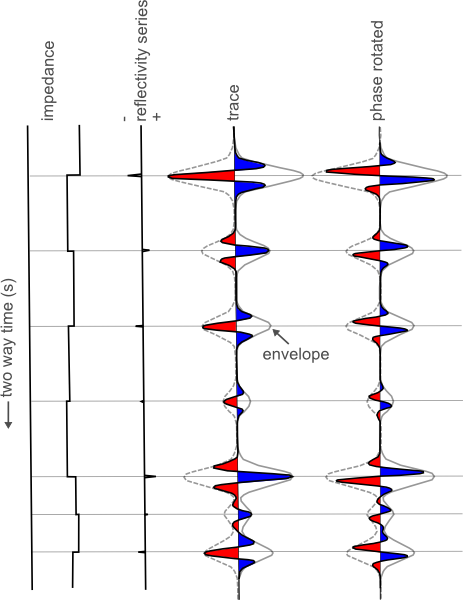
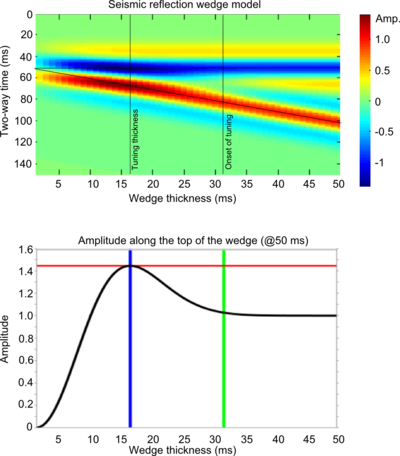
In this figure, a seismic wedge model is shown for a 25 Hz Ricker wavelet. The effects of tuning (or interference) are clearly seen as variations in shape, amplitude, and travel time along the top and base of the wedge. The tuning curve shows the amplitude along the top of the wedge (thin black lines). Interestingly, the apex of the wedge straddles the top and base reflections, an apparent mis-timing of the boundaries.

On a tuning curve there are (at least) two values worth noting; the onset of tuning, and the tuning thickness. The onset of tuning (marked by the green line) is the thickness at which the bottom of the wedge begins to interfere with the top of the wedge, perturbing the amplitude of the reflections, and the tuning thickness (blue line) is the thickness at which amplitude interference is a maximum.

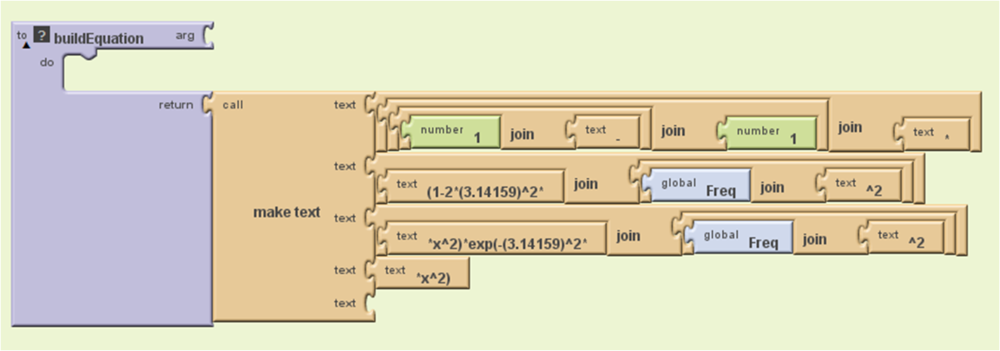
For a Ricker wavelet the amplitude along the top of the wedge is given by:

where R is the reflection coefficient at the boundary, f is the dominant frequency and t is the wedge thickness (in seconds). Building the seismic expression of the wedge helps to verify this analytic solution.

Wedge artifacts

The synthetic seismogram and the tuning curve reveal some important artifacts that the seismic interpreter needs to know about, because they could be pitfalls, or they could provide geological information:

Bright (and dim) spots: A bed thickness equal to the tuning thickness (in this case 15.6 ms) has considerably more reflective power than any other thickness, even though the acoustic properties are constant along the wedge. Below the tuning thickness, the amplitude is approximately proportional to thickness.

Mis-timed events: Below 15 ms the apparent wedge top changes elevation: for a bed below the tuning thickness, and with this wavelet, the apparent elevation of the top of the wedge is actually higher by about 7 ms. If you picked the blue event as the top of the structure, you'd be picking it erroneously too high at the thinnest part of the wedge. Tuning can make it challenging to account for amplitude changes and time shifts simultaneously when picking seismic horizons.

Limit of resolution: For a bed thinner than about 10 ms, the travel time between the absolute reflection maxima—where you would pick the bed boundaries—is not proportional to bed thickness. The bed appears thicker than it actually is.

Bottom line: if you interpret seismic data, and you are mapping beds around 10–20 ms thick, you should take time to study the effects of thin beds. We want to help! On Monday, I'll write about our new app for Android mobile devices, Tune*. 

Reference

Widess, M (1973). How thin is a thin bed? Geophysics, 38, 1176–1180. 

E is for Envelope

There are 8 layers in this simple blocky earth model. You might say that there are only 7 important pieces of information for this cartoon earth; the 7 reflectivity contrasts at the layer boundaries.

The seismic traces however, have more information than that. On the zero phase trace, there are 21 extrema (peaks / troughs). Worse yet, on the phase rotated trace there are 28. So somehow, the process of wave propagation has embedded more information than we need. Actually, in that case, maybe we shouldn't call it information: it's noise.

It can be hard to tell what is real and what is side lobe and soon, you are assigning geological significance to noise. A literal interpretation of the peaks and troughs would produce far more layers than there actually are. If you interpret every extreme as being matched with a boundary, you would be wrong.

Consider the envelope. The envelope has extrema positioned exactly at each boundary, and perhaps more importantly, it literally envelopes (I enunciate it differently here for drama) the part of the waveform associated with that reflection. 7 boundaries, 7 bumps on the envelope, correctly positioned in the time domain.

Notice how the envelope encompasses all phase rotations from 0 to 360 degrees; it's phase invariant. Does this make it more robust? But it's so broad! Are we losing precision or accuracy by accompanying our trace with it's envelope? What does vertical resolution really mean anyway?

Does this mean that every time there is an envelope maximum, I can expect a true layer boundary? I for one, don't know if this is fool proof in the face of interferring wavelets, but it has implications for how we work as seismic interpreters. Tomorrow we'll take a look at the envelope attribute in the context of real data.

Rock physics and steam

Over the last few weeks, I have been revisiting and reminiscing over some past work, and found this poster I made for the 2007 SEG Development & Production Forum on the geophysics of heavy oil. A few months ago, the organizers of the workshop made a book out of many great articles that followed. Posters, however, often get printed only once, but that doesn't mean they need only be viewed once.

The poster illustrates the majority of my MSc thesis on the rock physics of steam injection in Canadian oil sands. You might be interested in this if you are interested in small scale seismic monitoring experiments, volume visualization, and novel seismic attributes for SAGD projects. For all you geocomputing enthusiasts, you'll recognize that all the figures were made with MathWorks MATLAB (something I hope to blog about later). It was a fun project, because it merged disparate data types, rock physics, finite-difference modeling, time-lapse seismic, and production engineering. There are a ton of subsurface problems that still need to be solved in oil sands, many opportunities to work across disciplines, and challenge the limits of our geoscience creativity. 

Here's the full reference: Bianco, E & D Schmitt (2007). High resolution modeling and monitoring of the SAGD process at the Athabasca tar sands: Underground Test Facility (UTF), 2007 SEG D&P Forum, Edmonton, Canada. If you prefer, you can grab these slides which I gave as an oral presentation on the same material, or flip to chapter 6 in the book.